


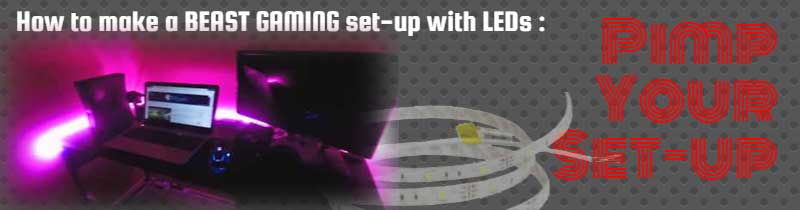
How to Make a LED Beast Gaming Set-up
Skill Level:
EASY
Estimated Time:
1 Hour
Cost:
From $35-$75
Tools
Scissors
Screwdriver
Wire Strippers
Solder Iron Optional
Heat gun Optional
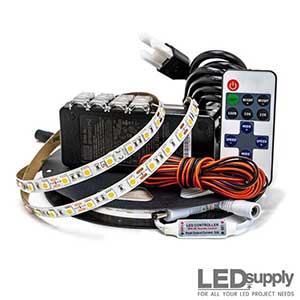
Materials
LED Flex Strips:
RGB LED StripsPower-Supply:
12Vdc OutputController:
RGB Controller & RemoteHeat Shrink:
Optional Heat ShrinkWire Nuts, Butt Splice Connectors, Electrical Tape
Overview: This set-up used our 12Vdc 2.0A switching power-supply that plugs directly into a standard outlet and has a barrel plug connection on the output side that can be directly connected to the RGB controller. The output of the controller connects to the RGB LED Strips and that completes the circuit.
Before starting it helps to overview a few details:
- LED Flexible Strip Wattage: 7.2 Watts/Meter
- LED Flexible Strip Voltage: 12Vdc
- Wattage is equal to = Volts X Amps
- RGB Controller: Line-of-Sight IR Remote, 12V 6A Input MAX, 15 Color Combos & 4 different Lighting Effects
Step 1
 The first step is to determine the number of linear feet or meters of LED strip your project requires. This project uses 6-feet or 2 meters. With 6 linear feet or approximately 2-meters the power consumption will be 14.4-watts. A 12Vdc 2Amp power-supply provides 24-watts, which is greater than the 14.4-watts required.
Step 2
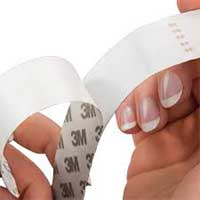
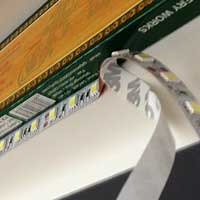
Step 2 is to adhere/mount the LED strips to a surface. The strips come standard with a strong 3M double-sided adhesive. In short increment simply peal the backing off the tape and stick the strips to a clean surface.
There are alternative methods used by some that have included plastic screw-in holders, large staples and hot glue.
Step 3
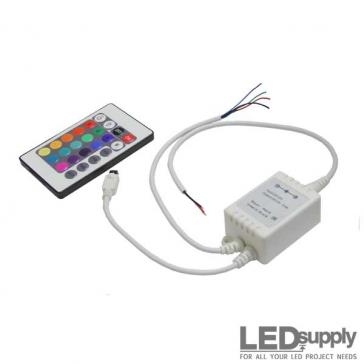 Step 3, time to find a location for the RGB controller that allows connection to the power-supply, the strips and at the same time puts the IR sensor in a good spot for line-of-site control with the remote. The RGB controller uses barrel plug connections for input and output; the controller also has tabs for mounting with screws if necessary. Feel free to use tape to mount the controller and or the IR sensor.
Step 4
Step 4 is making the connection from the RGB controller to the LED Strips. Match the output colored wires from the controller to the corresponding colors on the LED Strips. Red-to-red, green-to-green, blue-to-blue, and the black-to-yellow (ground). These connections can be made by soldering/heat-shrinking, butt-splice connectors, or wire nuts.
Step 5
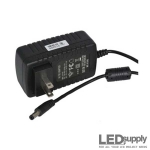
Step 5 is the final step and is simply plugging in the power-supply and connecting the output of the power-supply to the input of the RGB controller. Use the remote to turn on the strips. Double-check that the remote can see the IR sensor and that the plastic battery protector has been removed.


- Low Prices
- Knowledgeable Support
- 100K+ Orders Shipped
- Free Shipping
- Bulk Discounts
- 2,000+ 5-Star Reviews
LEDSupply is built, owned and operated by a select few, all with technical backgrounds and over 50-years combined experience in the LED industry. Click here for more about us.


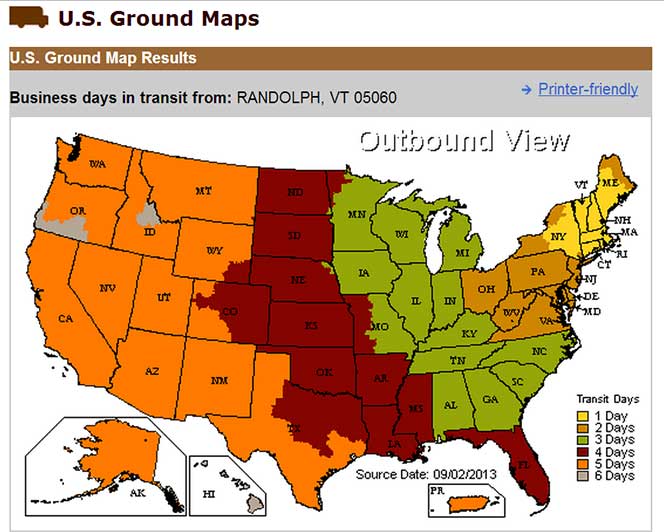
Shipping
LEDSupply does NOT profit from the shipping or handling of your order!
Orders received before 3PM EST will be safely packaged and quickly shipped the same business day. If your order is NOT shipped the same business day, LEDSupply will offer a 5% discount off your next order.
All orders SHIP FROM:
296 Beanville Road
Randolph, Vermont 05060
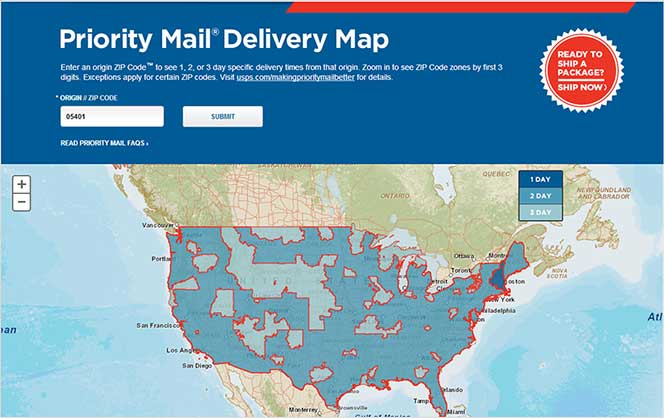
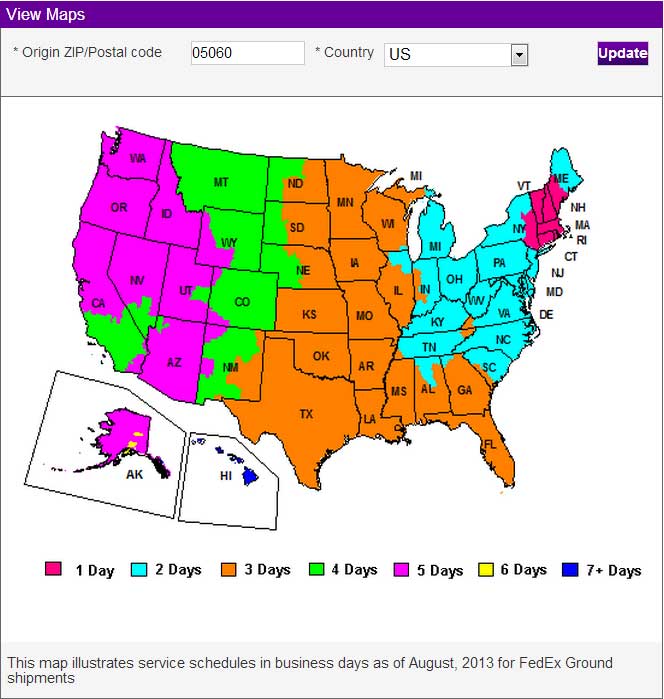
See respective ZONE maps below for SPECIFIC delivery time to your location:
Any order that does not qualify for free shipping, will by default include a discount of equal value to the free shipping offer.
The shipping offered is meant to provide the widest variety of shipping options at the lowest price:
USPS Priority Delivery Zone Map:
FedEX Ground Delivery Zone Map:
UPS Ground Delivery Zone Map: